The Legolas testing framework
This page gives a detailed overview on the various Legolas testing suites, how to run them and what they are testing.
As the Legolas codebase becomes larger when new features are implemented, it is important to test everything thoroughly to make sure that new or modified code does not break backwards compatibility or introduces bugs in pieces of code that previously worked.
Legolas has two levels of testing suites: unit tests and regression tests, all of which run on both the master and
develop branches for every commit or pull request. The Pylbo framework has its own dedicated testing suite.
All of these test suites are decoupled from each other and test distinctly different things: the unit tests are low-level
and test individual subroutines and functions in the Legolas source code using pFUnit.
The regression tests on the other hand are high-level and compare code output from a recent commit to previously known results, while
the Pylbo tests check data loading and management, interfacing with Legolas and visualisations.
The entire testing framework is supplemented with code coverage indications.
Our testing policy
When developing new features or modifying existing code we have a few general guidelines that we follow:
- All functions/subroutines in the Legolas or Pylbo source codes should be accompanied by one or more unit tests.
- Adding a new equilibrium means adding at least one regression test.
- Code coverage should not decrease (although in some cases a minor decrease is unavoidable).
Style checks
![]()
All Python files in the legolas repository (so Pylbo, setup files and test files) adhere to Black formatting standards, which automatically take care of trailing whitespaces, improper indents etc. We also run flake8 as style enforcement.
We explicitly check for both Black and flake8 formatting and style during the automated tests and strictly enforce this. Many IDEs support Black/flake8 plugins which can automatically format the file on save, so it may be useful to set this up if you are making edits to the source code.
The Legolas unit tests
Running the tests
To run the unit tests you will need to have pFUnit installed, which has some
prerequisites. Make sure Legolas is compiled, then navigate to
the tests folder and then down one level to the unit tests folder. In there, compile the tests and run:
mkdir build
cd build
cmake ..
make
cd ..
./test_legolas
This will execute the entire unit test suite.
Creating a new unit test
All similar tests are grouped together in dedicated .pf files. Either add a new test to an already existing file, or create
a new file. The module mod_suite_utils.f90 has a few convenient routines which can be used to set up or tear down new tests.
As a general rule of thumb all arrays should be deallocated and all global variables reset when a test finishes (on either failure or success),
to ensure that every test can run independently of the others.
If you added a new .pf file you will have to add it to the list in the CMakeLists.txt file in the unit tests folder.
Note that unit tests should test only a single (part of a) subroutine/function and should finish quickly. If you want to test multiple things, just split them in multiple tests as much as possible.
The Legolas regression tests
The regression tests run the various pre-implemented equilibria and compare the results with previously stored datfiles. Contrary to the Legolas unit tests
this suite is Python-based and uses pytest together with the Pylbo-Legolas interface to set up and run everything.
These tests mainly compare eigenvalues and eigenfunctions between new and previously stored results using an image-based comparison and the root-mean-squared difference.
How the regression tests work
During the regression tests we check both the eigenvalue spectrum and (only in some cases) the eigenfunctions.
Spectrum tests
These are done for all pre-implemented equilibria, and every spectrum test typically consists of four steps:
- Generate the datfile for the corresponding equilibrium
- For both the “new” datfile and the stored datfile:
- load the file
- for every region in the complex plane generate a spectrum (usually 3-4 images)
- save the images to a temporary folder
- Do a root-mean-squared (RMS) image comparison to check spectral similarity, fail the test if the RMS is above the tolerance (which is 2 by default).
- Save the difference between the two images as a new image on failure, otherwise delete the images.
An example of a failing test is shown here, where the background flow parameter for the Suydam cluster modes
was slightly changed:
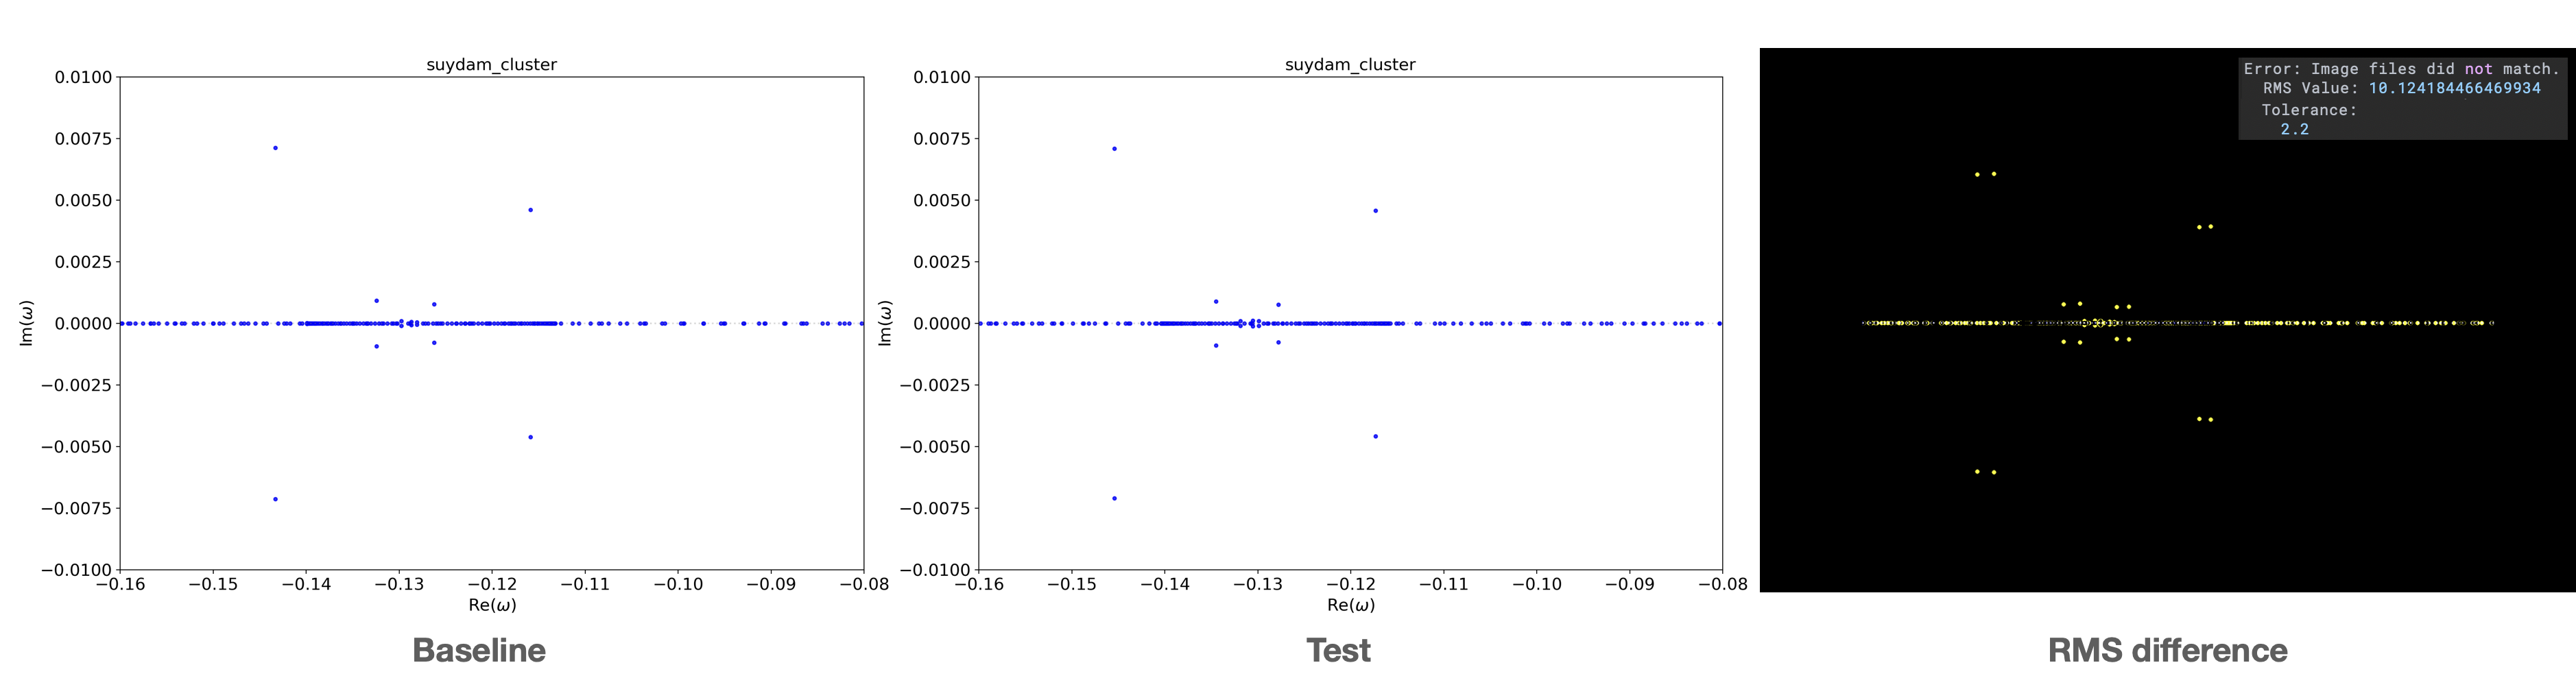 The left image is the expected baseline result, the center image the test result and the right image the difference
between both. In all these images there is no background alpha present, so all deviations in the RMS is purely due to shifting eigenvalues.
The left image is the expected baseline result, the center image the test result and the right image the difference
between both. In all these images there is no background alpha present, so all deviations in the RMS is purely due to shifting eigenvalues.
We also test multispectra, which is a composed spectrum for the same equilibrium but run with varying parameters. The testing principle remains the same: once the composed spectrum is created the baseline and test result are again compared on an RMS-based criterion.
Eigenfunction tests
These tests use a similar background as the spectrum tests and are also RMS-image-based. We do not check the eigenfunctions for all pre-implemented equilibria, only those that have clear, isolated eigenvalues and associated eigenfunctions that are properly resolved at low resolution. When the test datfile is generated some pre-set eigenvalues are selected and the eigenfunctions are queried. Then, for each eigenvalue we plot the sum of the real and imaginary parts of each eigenfunction as a function of the grid and save the images on a 3x3 grid (since we have 8 panels per image, per eigenvalue). The same principle as above is then applied, where the RMS value of the curves is checked against each other.
Running the tests
To run the regression tests make sure you have pytest installed, along with Pylbo and all its prerequisites. Then, navigate to the tests folder and move down
one level to the regression test directory, where you execute pytest.
cd tests/regression_tests
pytest
This will automatically create a directory tree called test_results inside the regression_tests folder. Every subdirectory corresponds to a single
regression test, with in turn multiple subdirectories for generated datfiles, spectrum images and eigenfunction images.
The above command will run the entire test suite. If you want to only run a specific test, provide the filename instead:
pytest test_uni_adiabatic.py
You can add as many filenames as you want, separated by a whitespace.
Note: tests that are passing will clean up after themselves by deleting the generated datfile and images.
You can ask the test suite to keep the images instead (for visual inspections, for example) by simply adding the --keep-files flag when running the tests.
Note: since some tests rely on data saved with pickle, tight control of the environment is necessary for these tests to pass. Before running the regression tests, it is recommended to set up the testing environment specified in the repository in .github/workflows/regression.yml.
Adding new tests
To add a new regression test create a new file in the regression test folder, and make sure to prepend the name with test_ so it can be picked up by pytest. Below is an example for a regression test of the taylor_couette equilibrium, with eigenfunctions. For additional inspiration there are plenty of tests set up in the regression_tests folder.
from .regression import RegressionTest
import numpy as np
import pytest


class TestExample(RegressionTest):
  name = "a descriptive name"
  filename = "a_descriptive_filename"
  equilibrium = "taylor_couette"
  geometry = "cylindrical"
  x_start = 1
  x_end = 2

  parameters = {
      "k2": 0,
      "k3": 1,
      "cte_rho0": 1.0,
      "alpha": 1.0,
      "beta": 2.0,
  }
  physics_settings = {
      "flow": True,
      "coaxial": True,
      "viscosity": True,
      "viscosity_value": 1e-3,
  }
  eigenfunction_settings = {
      "write_eigenfunctions": True,
      "write_eigenfunction_subset": True,
      "eigenfunction_subset_center": 0.5 - 0.3j,
      "eigenfunction_subset_radius": 0.5,
  }
  eigenvalues_are_real = False

  spectrum_limits = [
      {"xlim": (-18, 18), "ylim": (-3, 0.3)},
      {"xlim": (-1.5, 1.5), "ylim": (-1.25, 0.2), "RMS_TOLERANCE": 2.9},
  ]
  eigenfunctions = [
      {"eigenvalue": 0.87784 - 0.04820j},
      {"eigenvalue": 0.49861 - 0.08124j},
  ]

  @pytest.mark.parametrize("limits", spectrum_limits)
  def test_spectrum(self, limits, ds_test, ds_base):
      super().run_spectrum_test(limits, ds_test, ds_base)

  @pytest.mark.parametrize("eigenfunction", eigenfunctions)
  def test_eigenfunction(self, eigenfunction, ds_test, ds_base):
      super().run_eigenfunction_test(eigenfunction, ds_test, ds_base)
A few things of note:
- Every regression test should subclass
RegressionTest, and have their name start withTestsuch that it can be discovered automatically by pytest. - The
name,filename,parameters,geometryandequilibriumproperties are required to be set. - The properties
x_startandx_endare optional, and default to 0 and 1 respectively if not set. - The
parameters,physics_settingsandeigenfunction_settingsdictionaries follow the exact same conventions as used in parfile generation. An additional property calledsolver_settings(also a dict) can be used to specify the solver to be used, if not given this defaults to the QR algorithm. - The
eigenvalues_are_realproperty can be set toTrue, which will run an additional test to check that the imaginary part of every eigenvalue is numerically zero. IfFalse(default), complex values are allowed.
Generating spectrum image tests
As in the above example there is a list spectrum_limits with dictionaries as items. Every dictionary
has the following keys:
"xlim": this is a tuple representing the range in Re$(\omega)$ of the spectrum"ylim": this is a tuple representing the range in Im$(\omega)$ of the spectrum"RMS_TOLERANCE": [optional], this is a float representing a custom RMS tolerance to be used for this specific test. If not given the default value is used.
You can add as many items to this list as you want. In order to tell the testing suite to run the tests, provide the method test_spectrum as shown above:
@pytest.mark.parametrize("limits", spectrum_limits)
def test_spectrum(self, limits, ds_test, ds_base):
    super().run_spectrum_test(limits, ds_test, ds_base)
The method arguments should be the same as shown above, and within the method you call the run_spectrum_test method from the super class. This will automatically setup everything and run the tests.
The decorator @pytest.mark.parametrize("limits", spectrum_limits) is important, this tells pytest to
parametrise the spectrum_limits list given earlier, such that a test will run for every item in this list.
Generating eigenfunction image tests
For eigenfunction tests eigenfunctions should be set up using the eigenfunction_settings property.
Then, add the desired eigenvalues to an eigenfunctions list, which is similar to spectrum_limits. Every item is a dictionary with the following keys:
"eigenvalue": the (approximate) eigenvalue of which to test the eigenfunctions. This does not have to be exact, but should be as close as possible to the desired eigenvalue."RMS_TOLERANCE": [optional], this is a float representing a custom RMS tolerance to be used for this specific test. If not given the default value is used.
Again, you can add as many eigenvalues to this list as you want, and similar as before you should tell pytest to parametrise this list whilst calling the superclass method:
@pytest.mark.parametrize("eigenfunction", eigenfunctions)
def test_eigenfunction(self, eigenfunction, ds_test, ds_base):
    super().run_eigenfunction_test(eigenfunction, ds_test, ds_base)
Generating the baseline file
Once everything is set up properly and you run your newly created regression test it will probably fail due to the baseline file not being present. Once you are sure everything is correct you can (re)generate it by simply calling pytest with an additional argument:
pytest test_my_example.py --generate
This will automatically create a file BASE_{filename}.dat in the appropriate folder. If this file already exists you will be prompted to either overwrite or keep the existing file.
The Pylbo unit tests
To run the Pylbo unit tests you also need pytest, along with the timeout plugin which you can install as
pip install pytest-timeout
Then, ro tun the tests navigate to the tests/pylbo_tests folder and run
pytest -v